What is a Juicer? Simple & Essential Guide
A juicer is a kitchen appliance designed to extract the liquid nutrient-rich juice from fruits, vegetables, and herbs by separating it from the fibrous pulp. Unlike a blender, which creates a thick smoothie by processing the whole fruit, a juicer provides a clear, hydrating, and refreshing liquid. By removing the fiber, a juicer allows for rapid nutrient absorption and a lighter beverage experience that can be served chilled over ice for a revitalizing drink.
The Mechanics and Varieties: How Does a Juicer Function?
To understand what a juicer is, one must first understand the fundamental difference between extraction and blending. While a blender uses high-speed blades to pulverize entire fruits and vegetables into a thick consistency, a juicer focuses exclusively on the liquid content. It is a specialized tool that uses force—either centrifugal or slow-masticating—to rupture the cell walls of produce and release the “lifeblood” of the plant. This liquid contains the majority of the vitamins, minerals, and phytonutrients, but without the insoluble fiber that requires extensive digestion.
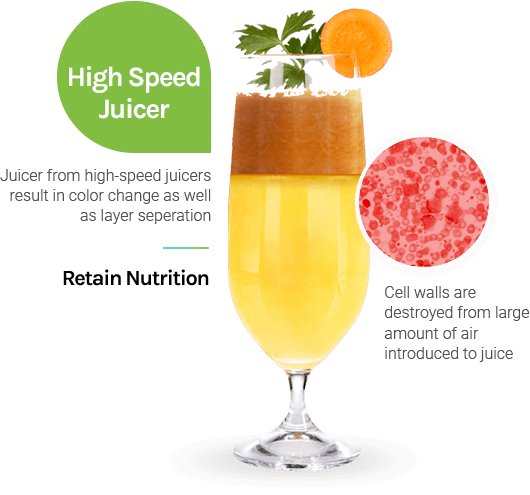
There are two primary types of juicers that dominate the market today: centrifugal juicers and masticating (cold-press) juicers. Centrifugal models are the most common and are known for their speed. They utilize a flat cutting blade at the bottom of a rapidly spinning basket. As the produce hits the blade, it is shredded, and the juice is forced through a fine mesh screen by centrifugal force. These are excellent for those who want a refreshing juice quickly, though they tend to be noisier and may introduce more heat and oxygen into the juice, slightly reducing its shelf life.
On the other hand, masticating juicers are often referred to as “cold-press” machines. These operate at much lower speeds, using a slow-turning screw or auger to crush and squeeze the produce against a screen. This method is highly efficient for leafy greens and wheatgrass, which a centrifugal juicer often struggles to process. Because there is minimal heat generated, the juice stays chilled longer and retains a higher concentration of live enzymes. This results in a more hydrating and nutrient-dense beverage that many enthusiasts prefer for long-term health benefits.
The choice between these machines often comes down to lifestyle. If you are looking for a quick morning boost before work, a centrifugal model is your best friend. However, if you are a “juicing purist” who wants to extract every possible drop from kale or spinach, the masticating juicer is the superior choice. Regardless of the type, the end goal remains the same: a pure, pulp-free liquid that serves as a powerful delivery system for plant-based nutrition.
Mastering the Art: A Step-by-Step Guide to Using Your Juicer
Operating a juicer effectively requires more than just tossing in an apple and hitting the “on” switch. To get the most out of your produce and ensure your machine lasts for years, follow this structured approach to creating the perfect refreshing drink.
Step 1: Preparation and Cleaning
Before you begin, wash all your fruits and vegetables thoroughly. Even though you aren’t eating the skin of some items, the juicing process can transfer surface bacteria into the liquid. Cut your produce into sizes that easily fit into the juicer’s feed chute. For centrifugal juicers, you can often leave items larger, but for masticating juicers, smaller pieces prevent the auger from jamming. If you are using frozen ingredients, ensure they are slightly thawed, as most standard juicers are not designed to process rock-hard frozen blocks (unlike a heavy-duty blender).
Step 2: The Order of Extraction
The sequence in which you add ingredients matters. Start with your leafy greens (like spinach or kale). Since they are lighter, following them with “watery” produce like cucumbers or celery helps wash through the remaining green bits. Finish with your densest fruits, like apples or carrots. This “sandwich” method ensures that the juicer’s screen stays clear and you get the maximum yield. If you plan on serving the drink chilled, you can even juice a few slices of lemon or ginger at the end to act as a natural preservative and flavor booster.
Step 3: Managing the Pour
Most juicers come with a dedicated juice pitcher that includes a foam separator. As the juice is extracted, a layer of froth often forms on top. This foam is perfectly safe to drink, but for a professional look, the separator allows you to pour a crystal-clear liquid into your glass. To keep the drink hydrating and cold, fill your serving glass with ice before pouring. The sudden drop in temperature helps lock in the flavors and makes the experience far more enjoyable on a warm day.
Step 4: The Finishing Touches
A great juice should appeal to all the senses. Once your juice is in the glass, consider a garnish. A sprig of mint, a slice of cucumber on the rim, or a light dusting of cayenne pepper can elevate a simple vegetable juice into a culinary experience. If the juice is too concentrated for your palate, you can always dilute it with a splash of sparkling water for a lighter, more refreshing finish.
Step 5: Immediate Cleanup
This is the most critical step. Once you are finished, disassemble the juicer immediately and rinse the parts. The fibrous pulp dries quickly and can become like cement on the fine mesh screen. Most modern juicers are dishwasher safe, but a quick manual scrub of the screen with a stiff brush is usually necessary to maintain optimal performance.

Important Considerations and Common Mistakes
While juicing is a fantastic way to improve your nutrient intake, there are several factors to keep in mind to ensure you are doing it safely and effectively. One of the most common mistakes is “sugar overloading.” When you remove the fiber from fruits, the natural sugars are absorbed much more rapidly into the bloodstream. If you juice five oranges, you are consuming the sugar of five oranges in seconds without the fiber to slow down the insulin response. A better practice is the 80/20 rule: 80% vegetables and 20% fruit for sweetness.
Another consideration is the storage of your juice. Freshly extracted juice is highly susceptible to oxidation. The moment the juice is exposed to air, the nutrients begin to degrade. For the best results, you should drink your juice immediately. If you must store it, use an airtight glass container, fill it to the very top to minimize air space, and keep it chilled in the refrigerator. Even then, most juices should be consumed within 24 to 48 hours.
Finally, be mindful of the “waste.” The pulp that the juicer discards is still full of healthy fiber. Instead of throwing it away, many savvy home cooks use it in muffins, soups, or even as a base for veggie burgers. If you find the pulp is still very wet, it might be a sign that your juicer isn’t operating efficiently or that you need to slow down your feeding pace. A high-quality extraction should leave the pulp feeling relatively dry to the touch.
- Keep it Cool: Always serve your juice over ice or use produce that has been pre-chilled in the refrigerator for the most refreshing taste.
- The Citrus Secret: Peel oranges and grapefruits before juicing, as the pith can be bitter, but leave the skin on lemons and limes for an extra zing.
- Pulp Power: If you use a blender for other tasks, try blending your juicer’s leftover pulp into a frozen smoothie to ensure zero waste.
- Hydration Boost: Use cucumber or celery as your base for a highly hydrating drink that is low in calories and high in electrolytes.
- Garnish for Success: A simple garnish like a sprig of rosemary or a zest of lime can transform the aroma of earthy beet or carrot juices.
Summary and Final Recommendations
A juicer is more than just another kitchen gadget; it is a gateway to a more hydrating and vibrant lifestyle. By separating the vital nutrients from the fiber, it provides a unique way to consume a vast array of produce that might be difficult to eat whole in a single day. Whether you prefer the speed of a centrifugal model or the efficiency of a cold-press machine, the key is consistency and variety. Remember to balance your ingredients, drink your creations while they are chilled, and don’t forget the ice and garnish to make every glass feel like a treat. With the right approach, your juicer will become the most valuable tool in your pursuit of health and refreshment.
❓ Frequently Asked Questions
1
How long does fresh juice last in fridge?
Fresh juice is best consumed immediately but can last up to 48 hours in the refrigerator. Store it in an airtight glass container to minimize oxidation and preserve its hydrating properties. If the juice changes color significantly or smells sour, it is best to discard the batch.
2
Can I make juice ahead of time?
Yes, you can make juice ahead of time, though nutrient levels begin to drop quickly after extraction. To maintain a refreshing taste, fill your container to the very top to reduce air exposure. Keeping it cold is essential, and adding lemon juice helps preserve the vibrant color.
3
What can I substitute for a juicer?
If you do not have a juicer, you can use a high-speed blender to pulse your produce with a little water. Once blended, pour the mixture through a nut milk bag or fine-mesh strainer to remove the pulp. This allows you to create smooth, refreshing beverages easily.
4
How do I know when my juice is done?
Juicing is complete when the appliance stops producing liquid and the pulp in the collection bin looks relatively dry. Most small batches take only a minute or two to process. Ensure you have pushed all ingredients through the chute before turning the machine’s motor off entirely.
5
Can I freeze fresh vegetable juice?
You can freeze fresh juice for up to three months. Use ice cube trays for easy portioning, then transfer the frozen cubes to a freezer bag. This is a great way to have hydrating shots ready to add to water or smoothies whenever you need a quick boost.