Make Your Own Coconut Milk: Simple & Fresh
There is something truly magical about the aroma of fresh coconut wafting through your kitchen, a scent that transports you immediately to a sun-drenched tropical beach. While store-bought cartons are convenient, they often contain stabilizers, thickeners, and preservatives that mask the true, vibrant flavor of the fruit. When you decide to make your own coconut milk, you are choosing a path of pure, unadulterated creaminess that will elevate your morning coffee, thicken your favorite curries, and add a velvety texture to your smoothies. This recipe is perfect for health-conscious foodies, fans of plant-based living, or anyone who appreciates the simple joy of creating kitchen staples from scratch. You will love how cost-effective and remarkably fresh this DIY version tastes compared to anything found on a grocery store shelf.
- ⏱️ Prep Time: 10 minutes
- 🍳 Cook Time: 5 minutes
- 👥 Servings: 4 servings
- 📊 Difficulty: Easy
Ingredients for Homemade Coconut Milk
Before you begin this recipe, gather these simple ingredients. The quality of your components will directly dictate the richness of the final product. Using high-quality dried coconut ensures that the natural oils are preserved, providing that signature mouthfeel we all crave.
- 🥥 2 cups Unsweetened Shredded Coconut: Ensure you are using desiccated or shredded coconut that has no added sugars. The finer the shred, the easier it is to extract the milk, though standard shredded varieties work perfectly.
- 💧 4 cups Filtered Water: Using filtered water prevents any metallic or chlorine tastes from interfering with the delicate coconut flavor. You will be heating this water to help release the fats.
- 🧂 1 pinch Sea Salt: A tiny amount of salt acts as a flavor enhancer, cutting through the richness and making the coconut taste even more “coconutty.”
- 🍯 Optional Sweetener: If you prefer a slightly sweeter milk for drinking, you can add one pitted Medjool date or a teaspoon of maple syrup during the blending process.
- 🍦 Optional Vanilla: A half-teaspoon of pure vanilla extract adds a lovely floral note that pairs beautifully with the tropical base.
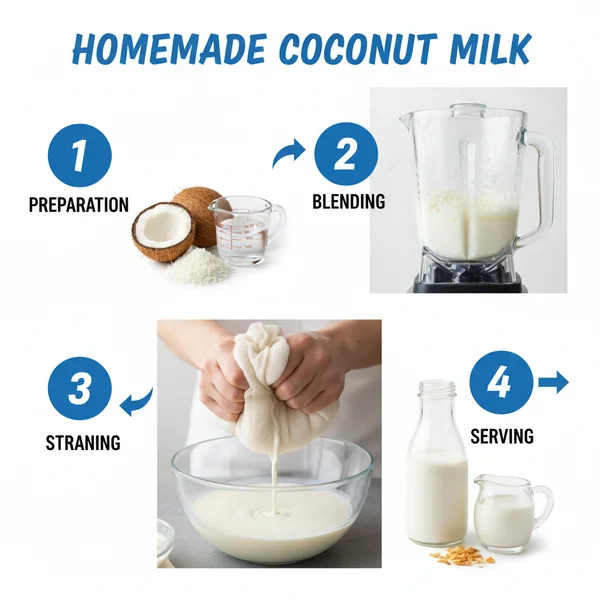
Step-By-Step Instructions
The process to make your own coconut milk is surprisingly therapeutic. It involves minimal cooking time and relies mostly on the power of a good blender and the heat of your water to emulsify the natural oils. Follow these detailed instructions to achieve a professional-grade result every single time.
Step 1: Prepare the Coconut Base. Start by measuring your two cups of unsweetened shredded coconut. Place the coconut directly into the pitcher of a high-speed blender. If you are using a standard blender, you might want to pulse the dry coconut a few times first to break it into smaller fragments, which increases the surface area for the water to penetrate. This small prep step ensures that you extract every possible bit of creaminess from the dried fruit during the later stages.
Step 2: Heat the Filtered Water. In a small saucepan or a tea kettle, heat your four cups of filtered water. You do not want the water to reach a rolling boil, as extreme heat can sometimes “cook” the coconut and change its flavor profile. Aim for a temperature just below boiling, around 175 to 200 degrees Fahrenheit. The water should be steaming and hot to the touch. This specific temperature is crucial because it helps to soften the coconut fibers and melt the solid fats (the coconut oil) contained within the shreds, allowing them to mix into the liquid easily.
Step 3: Combine and Soak. Carefully pour the hot water over the shredded coconut in the blender. At this stage, add your pinch of sea salt and any optional sweeteners like a date or maple syrup. Before turning the blender on, let the mixture sit for about 3 to 5 minutes. This brief soaking period allows the coconut to rehydrate. You will notice the water starts to turn a cloudy, milky white even before you begin blending. This is a sign that the fats are already starting to migrate into the water.
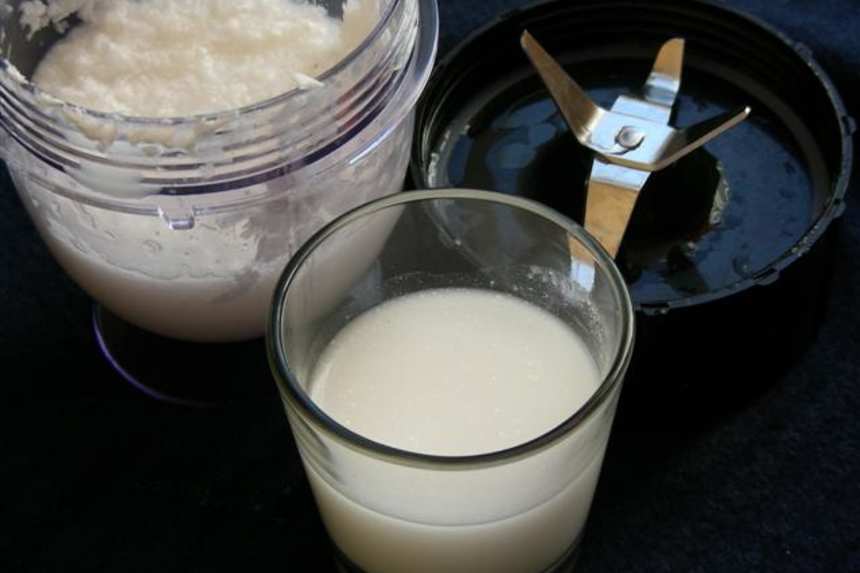
Step 4: The High-Speed Blend. Secure the lid of your blender tightly. Start the blender on the lowest speed and gradually increase it to the highest setting. Blend on high for a full 2 minutes. You want to see the mixture spinning in a powerful vortex. The goal is to pulverize the coconut shreds into the smallest particles possible. By the end of this step, the liquid should look incredibly thick, frothy, and creamy. If the blender feels warm to the touch, that is perfectly normal due to the friction and the pre-heated water.
Step 5: Straining the Milk. Place a large nut milk bag or a double layer of cheesecloth over a deep mixing bowl. Carefully pour the blender’s contents into the bag. Be cautious, as the liquid may still be quite warm. Allow the bulk of the liquid to drain through the mesh on its own for a minute. This is the stage where you begin to see the fruits of your labor as the pure, white milk collects in the bowl below, leaving the spent pulp behind.
Step 6: The Final Squeeze. Once the initial dripping slows down, gather the top of the nut milk bag and twist it shut. Using clean hands, squeeze the bag firmly to extract every last drop of moisture. Do not be afraid to use some muscle here; the richest fats are often the last to leave the pulp. Keep squeezing until the pulp inside the bag feels relatively dry and crumbly. You should now have a bowl full of beautiful, frothy homemade coconut milk ready for use or storage.
To get an even creamier result, try using a 1:1 ratio of coconut to water (2 cups coconut to 2 cups water). This creates a “heavy” coconut milk similar to the canned variety used for rich desserts. Additionally, never throw away the leftover pulp! You can spread it on a baking sheet and dry it in a low-temperature oven to create your own coconut flour, or stir it into oatmeal and cookie dough for extra fiber and flavor.
Variations & Substitutions
One of the best reasons to make your own coconut milk is the ability to customize the recipe to your dietary needs and taste preferences. This recipe is naturally vegan, gluten-free, and paleo-friendly, but you can take it a step further with these variations:
- Toasted Coconut Milk: For a nutty, caramelized flavor, lightly toast your shredded coconut in a dry skillet over medium heat for 3-5 minutes until golden brown before adding it to the blender. This version is incredible in iced lattes.
- Chocolate Coconut Milk: Add 2 tablespoons of high-quality cocoa powder and an extra tablespoon of maple syrup during Step 4. It tastes like a tropical chocolate milkshake!
- Golden Coconut Milk: Add a half-teaspoon of turmeric, a pinch of black pepper, and a dash of ginger for an anti-inflammatory “Golden Milk” base that is perfect for warming up in the evening.
- Fresh Coconut Version: If you have access to fresh brown coconuts, you can use 2 cups of the fresh meat (peeled and chopped) instead of shredded coconut. Use the same hot water method for the best extraction.
Storage & Make Ahead
Because this recipe contains no preservatives or stabilizers, it will naturally separate in the refrigerator. The rich coconut cream will rise to the top, while the lighter liquid stays at the bottom. This is perfectly normal! Simply give the jar a vigorous shake before each use to re-emulsify the ingredients. Store your coconut milk in a sealed glass jar or airtight container in the fridge for up to 4 to 5 days.
If you want to make it ahead in large batches, you can freeze it. Pour the milk into ice cube trays and freeze them. Once solid, transfer the cubes to a freezer bag. These coconut cubes are perfect for dropping directly into hot coffee or blending into morning smoothies without needing extra ice. Frozen coconut milk will stay fresh for up to 3 months.
- Calories: 145 kcal
- Total Fat: 14g
- Carbohydrates: 5g
- Fiber: 3g
- Protein: 1.5g
- Sodium: 15mg
*Nutritional values are estimates based on standard ingredients and assume some pulp remains in the milk. Actual calories may vary depending on how much you squeeze the pulp.
Mastering the ability to make your own coconut milk is a fundamental skill for any home cook looking to improve the quality of their ingredients. With a total prep time and cooking time of under fifteen minutes, there is no reason not to try this at home. Your taste buds—and your wallet—will certainly thank you for the upgrade!
❓ Frequently Asked Questions
1
How long does homemade coconut milk last in fridge?
Your fresh homemade coconut milk will stay fresh in the refrigerator for about 4 to 5 days. Since it lacks the preservatives and stabilizers found in canned versions, it is important to keep it in an airtight glass jar and give it a quick shake before using.
2
Can I make coconut milk ahead of time?
Yes, you can certainly prepare this recipe ahead of time. Making it a day in advance actually allows the flavors to settle perfectly. Just remember that the fat will naturally separate and rise to the top when chilled, so simply stir or shake it to recombine the layers.
3
What can I substitute for shredded coconut?
If you do not have unsweetened shredded coconut, you can use fresh coconut meat scooped directly from a mature brown coconut. Simply peel the brown skin off the meat and chop it into small pieces before blending with the hot water to achieve a similarly rich and creamy result.
4
How do I know when the coconut milk is done?
The process is finished once the mixture in the blender looks thick, white, and completely opaque after blending for about two minutes. After straining through a nut milk bag or cheesecloth, you should have a smooth liquid that is free from any gritty coconut solids or grainy particles.
5
Can I freeze homemade coconut milk?
You can freeze homemade coconut milk for up to three months. It is best to freeze it in ice cube trays for easy portioning later. While the texture may change slightly upon thawing, it remains perfect for use in cooked dishes, morning smoothies, or flavorful tropical soups.