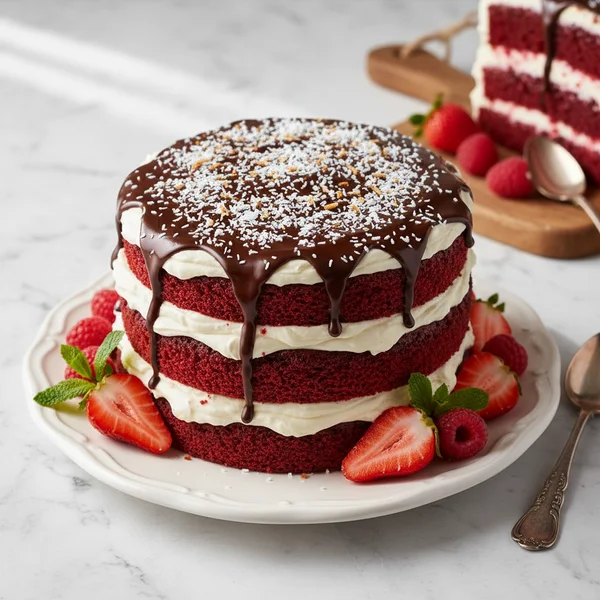
Coconut Red Velvet Cake: Ultimate Homemade Recipe
Imagine a dessert that combines the deep, cocoa-infused allure of a classic Southern staple with the tropical, nutty sweetness of the islands. This coconut red velvet cake is exactly that—a stunning masterpiece that balances rich, velvety textures with a refreshing coconut finish. It is the perfect centerpiece for a birthday celebration, a holiday gathering, or a weekend indulgence when you want something truly extraordinary. The vibrant crimson crumb hidden beneath a snowy blanket of coconut flakes makes every slice a visual and culinary delight. Whether you are a fan of traditional red velvet or a coconut lover looking for a new favorite, this recipe promises to deliver a moist, tender, and flavor-packed experience that will leave your guests asking for seconds.
- ⏱️ Prep Time: 25 minutes
- 🍳 Cook Time: 35 minutes
- 👥 Servings: 12 servings
- 📊 Difficulty: Medium
Ingredients for the Ultimate Cake
To achieve the perfect balance of flavor and structure, you will need to gather high-quality ingredients. Ensure your dairy and eggs are at room temperature to create a smooth, emulsified batter.
- For the Red Velvet Layers:
- 2 1/2 cups all-purpose flour, sifted
- 1 1/2 cups granulated white sugar
- 1 teaspoon baking powder
- 1 teaspoon baking soda
- 1 teaspoon fine salt
- 2 tablespoons unsweetened cocoa powder
- 1 1/2 cups vegetable oil or melted unsalted butter
- 1 cup room temperature buttermilk
- 2 large eggs, room temperature
- 2 tablespoons red food coloring (gel preferred)
- 1 teaspoon distilled white vinegar
- 2 teaspoons pure vanilla extract
- 1/2 cup sweetened shredded coconut (finely chopped)
- For the Coconut Cream Frosting:
- 16 ounces cream cheese, softened
- 1/2 cup unsalted butter, softened
- 4 cups powdered sugar, sifted
- 1 tablespoon heavy cream or whipped cream for stability
- 1 teaspoon vanilla extract
- 1/2 teaspoon coconut extract (optional for extra punch)
- 2 cups sweetened shredded coconut for coating the exterior
Step-By-Step Baking Instructions
1. Start by preheating your oven to 350 degrees Fahrenheit (175 degrees Celsius). Prepare two 9-inch round cake pans by greasing them generously with butter and dusting them with a light coating of flour. For the best results, place a circle of parchment paper at the bottom of each pan. This ensures that your delicate coconut red velvet cake releases perfectly without any sticking or tearing. Setting the stage correctly is the first step toward a professional-looking dessert.
2. In a large mixing bowl, sift together your dry ingredients. Combine the all-purpose flour, baking powder, baking soda, salt, and cocoa powder. Sifting is a vital step because it aerates the flour and removes any lumps from the cocoa, resulting in a much lighter and more tender crumb. Set this mixture aside. Using a whisk to further blend these items ensures that the leavening agents are evenly distributed throughout the batter.
3. In a separate large bowl or the bowl of a stand mixer, combine the granulated sugar and the vegetable oil or melted butter. If you prefer a richer flavor, butter is the way to go, but oil provides a consistently moist texture that lasts for days. Beat these together on medium speed for about two minutes until the sugar is well incorporated. This provides the base structure and moisture level for your cake layers.
4. Add the eggs one at a time, beating well after each addition. This allows the protein in the eggs to bond correctly with the fats. Once the eggs are incorporated, pour in the vanilla extract, the red food coloring, and the distilled white vinegar. The vinegar reacts with the buttermilk and cocoa to enhance the red hue and provide that signature tangy red velvet flavor profile. Mix until the color is vibrant and uniform throughout the liquid base.
5. Now, you will alternate adding the dry flour mixture and the buttermilk to the wet ingredients. Start by adding one-third of the flour mixture, then half of the buttermilk, another third of the flour, the rest of the buttermilk, and finally the remaining flour. Mix on low speed just until combined. Over-mixing at this stage can develop too much gluten, which leads to a tough cake. Finally, gently fold in the half cup of finely chopped shredded coconut with a spatula. This adds a subtle crunch and tropical flavor to every bite.
6. Divide the batter evenly between your two prepared cake pans. Tap the pans gently on the counter to release any large air bubbles. Place them on the center rack of the oven and bake for 30 to 35 minutes. You will know they are ready when a wooden skewer inserted into the center comes out clean or with just a few moist crumbs attached. Avoid over-baking, as this can dry out the delicate velvet texture.
7. Once baked, remove the pans from the oven and let them cool on a wire rack for at least 15 minutes. After this initial cooling period, carefully run a knife around the edges and invert the cakes onto the wire rack to cool completely. It is imperative that the cakes are entirely cold before you attempt to apply any frosting or icing. A warm cake will melt the butter in the frosting, leading to a messy, sliding disaster.
8. While the cakes cool, prepare your coconut cream cheese frosting. In a clean bowl, beat the softened cream cheese and butter together until the mixture is pale and very fluffy. Gradually add the powdered sugar one cup at a time, mixing on low speed to avoid a sugar cloud, then increasing to high. Mix in the vanilla extract and coconut extract. For a lighter, more airy texture, you can fold in a few tablespoons of stiffly whipped cream at the very end. This creates a cloud-like consistency that spreads like a dream.
9. To assemble, place one cake layer on your serving plate. Spread a generous layer of frosting over the top. Sprinkle a small handful of shredded coconut over the frosting for extra texture. Place the second cake layer on top, bottom-side up, to ensure a perfectly flat surface for the top of your cake. Apply a thin “crumb coat” of frosting over the entire cake and refrigerate for 20 minutes to set. This keeps the red crumbs from bleeding into your pristine white icing.
10. Apply the remaining frosting over the top and sides of the cake. While the icing is still fresh and tacky, press the 2 cups of shredded coconut all over the sides and top of the cake until it is completely covered in a beautiful, snowy layer. This provides a stunning visual contrast to the red interior and adds a magnificent tropical aroma. Chill for at least one hour before slicing to let the flavors meld together.
For the most vibrant color without using excessive liquid dye, use gel food coloring. If you find your frosting is too soft, add more powdered sugar or chill it for 15 minutes before assembly. To get the coconut to stick perfectly to the sides, hold the cake plate in one hand and gently press handfuls of coconut against the sides with the other, letting the excess fall onto a tray below for reuse. Always use full-fat buttermilk for the best chemical reaction with the baking powder and cocoa.
Variations & Substitutions
This recipe is highly adaptable to suit various dietary needs and flavor preferences. For a gluten-free version, substitute the all-purpose flour with a high-quality 1:1 gluten-free baking blend that contains xanthan gum. If you wish to make this vegan, use a vegan butter substitute, flax eggs (1 tablespoon ground flaxseed mixed with 3 tablespoons water per egg), and a coconut-milk-based “buttermilk” made by adding vinegar to full-fat coconut milk. For a different flavor profile, try adding a layer of pineapple preserves between the cake layers to create a “Pina Colada” red velvet hybrid. You can also toast the coconut flakes for the exterior to provide a deeper, nuttier flavor and a golden-brown aesthetic.
Storage & Make Ahead
Because of the cream cheese in the icing, this cake should be stored in the refrigerator. Place it in a cake carrier or cover it loosely with plastic wrap to prevent it from drying out; it will stay fresh for up to five days. If you want to make it ahead of time, you can bake the cake layers, wrap them tightly in plastic wrap once cooled, and freeze them for up to three months. Thaw the layers in the fridge overnight before frosting. The frosting can also be made 48 hours in advance and stored in the fridge—just give it a quick whip with a mixer before using to restore its fluffy texture.
Calories: 580kcal | Total Fat: 34g | Saturated Fat: 18g | Cholesterol: 85mg | Sodium: 310mg | Carbohydrates: 68g | Fiber: 2g | Sugar: 48g | Protein: 6g
Enjoying a slice of this coconut red velvet cake is a multi-sensory experience. From the first sight of the snow-white exterior to the moment your fork sinks into the moist, red crumb, it is clear why this is a favorite for bakers everywhere. The interplay between the slight tang of the cream cheese, the subtle cocoa of the velvet base, and the tropical sweetness of the coconut creates a sophisticated flavor profile that isn’t overly sugary. It is a bold, beautiful, and absolutely delicious way to celebrate any occasion. Happy baking!
❓ Frequently Asked Questions
1
How long does coconut red velvet cake last in fridge?
This cake stays fresh for about 3 to 5 days when stored in an airtight container in the refrigerator. The cream cheese frosting is perishable, so keeping it chilled is essential. For the best texture, let a slice sit at room temperature for 15 minutes before serving.
2
Can I make coconut red velvet cake ahead of time?
Yes, you can bake the cake layers up to two days in advance. Wrap the cooled layers tightly in plastic wrap and store them at room temperature or in the fridge. You can also frost the entire cake a day early, as the flavors often improve overnight.
3
What can I substitute for buttermilk?
If you don’t have buttermilk, you can easily make a substitute. Combine one cup of whole milk with one tablespoon of lemon juice or white vinegar. Let it sit for about five to ten minutes until it curdles slightly before adding it to your cake batter as directed.
4
How do I know when coconut red velvet cake is done?
The cake is done when a toothpick or cake tester inserted into the center of the layers comes out clean or with just a few moist crumbs. Additionally, the edges should start to pull away slightly from the sides of the pan and the top should spring back when pressed.
5
Can I freeze coconut red velvet cake?
You can freeze individual slices or the entire cake for up to three months. Wrap the cake or slices tightly in plastic wrap followed by a layer of aluminum foil. Thaw the cake overnight in the refrigerator before serving to ensure the best flavor and moist texture.