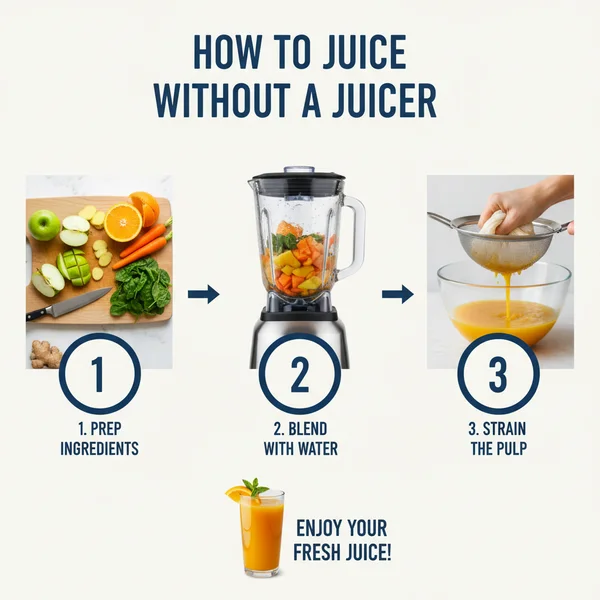
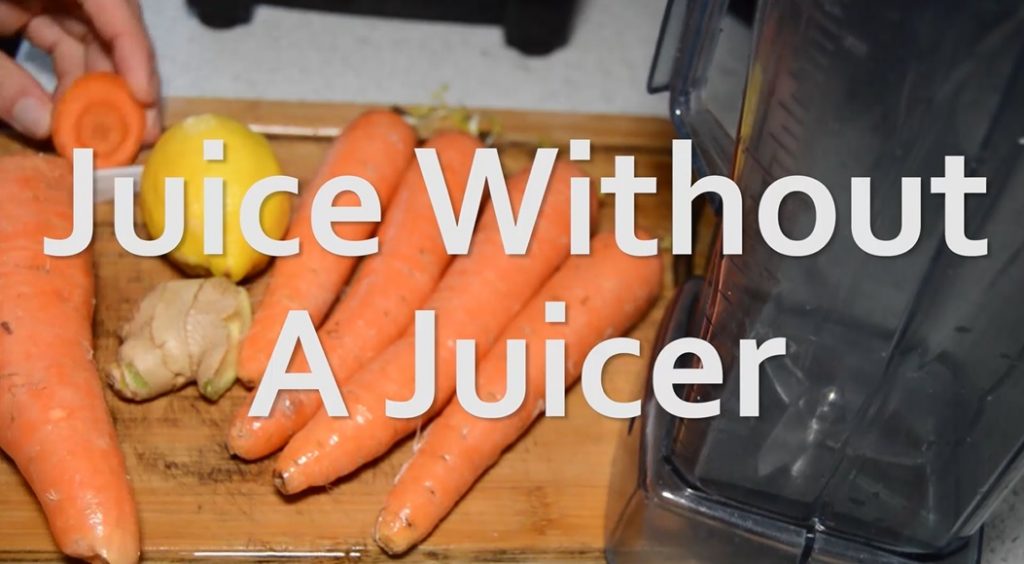
How to Juice Without a Juicer: Simple & Easy Method
You can easily juice without a juicer by using a high-speed blender and a fine-mesh strainer or a nut milk bag. This method, often called “blender juicing,” involves blending your favorite fruits and vegetables with a small amount of liquid and then straining the mixture to remove the fibrous pulp. The result is a refreshing, hydrating, and nutrient-dense juice that is best served chilled over ice for a crisp finish.
The Mechanics and Benefits of Juicing with a Blender
The concept of juicing without a dedicated centrifugal or masticating juicer might seem unconventional, but it is a highly effective and popular alternative for home cooks. At its core, juicing is simply the process of separating the liquid content of produce from its solid, fibrous components. While a traditional juicer uses blades or an auger to mechanically press the juice out of the plant cells, a high-speed blender achieves a similar result through rapid emulsification.
When you blend fruits and vegetables, you are pulverizing the cell walls, releasing the vitamins, minerals, and phytonutrients into a liquid suspension. Because a blender requires a small amount of liquid to facilitate the movement of the ingredients around the blades, the resulting “juice” is often slightly more voluminous than what you would get from a standard juicer. This process is incredibly hydrating, as it retains the natural water content of the produce while allowing you to control the exact consistency.
From a practical standpoint, using a blender is often more efficient for many households. Dedicated juicers are notoriously difficult to clean, with multiple intricate parts that require scrubbing. In contrast, a blender can be cleaned in seconds by blending warm water and a drop of dish soap. Furthermore, the blender method allows you to experiment with frozen ingredients, which a traditional juicer cannot handle. By incorporating frozen berries or mango, you can create a slushy-style juice that stays chilled much longer without the need for additional ice that might dilute the flavor. Scientifically, this method also minimizes the heat exposure that occurs in some high-speed centrifugal juicers, potentially preserving more heat-sensitive enzymes and antioxidants.
How to Juice Without a Juicer: A Step-by-Step Guide
Transitioning from whole produce to a glass of refreshing juice using only a blender is a straightforward process. Follow these steps to ensure a smooth, professional-grade result every time.
1. Prepare Your Produce: Start by washing all fruits and vegetables thoroughly. Since a blender is powerful, you don’t need to chop things into tiny pieces, but removing large pits (like those in peaches or cherries) and tough peels (like citrus rinds) is essential. If you are using leafy greens like kale or spinach, remove any woody stems.
2. Layering the Ingredients: Place the softest, most water-dense ingredients at the bottom of the blender canister. This includes things like cucumbers, oranges, or grapes. Layer harder items like carrots or apples on top. If you want a chilled drink immediately, you can add a small handful of ice or use frozen fruit components at this stage.
3. Add a Liquid Base: Unlike a traditional juicer, a blender needs a “starter” liquid to create a vortex. Add about 1/2 cup to 1 cup of filtered water, coconut water, or even green tea. This helps the blades catch the produce and ensures a smooth blend without overheating the motor.
4. The Blend: Start on the lowest speed and gradually increase to high. Blend for 45 to 60 seconds until the mixture looks like a completely uniform smoothie. There should be no visible chunks of produce remaining.
5. The Straining Process: This is where the magic happens. Place a nut milk bag or a fine-mesh strainer lined with cheesecloth over a large bowl. Pour the blended mixture into the bag. If using a bag, squeeze it firmly with clean hands to extract every drop of liquid. If using a strainer, use the back of a spoon to press the pulp down firmly.
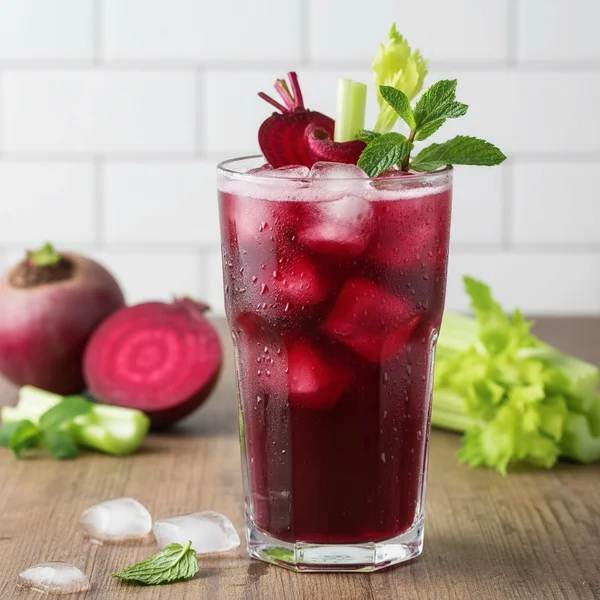
6. Cool and Serve: Once the juice is collected, pour it into a glass. For the best experience, serve it chilled. You can add a few cubes of ice and a garnish—such as a sprig of mint, a slice of lime, or a cucumber ribbon—to elevate the presentation and aroma.
Important Considerations for Perfect Results
While blender juicing is versatile, there are several factors to keep in mind to avoid common pitfalls. One of the most important considerations is the type of strainer you use. A standard kitchen colander will have holes that are too large, allowing too much pulp to pass through, resulting in a gritty texture rather than a smooth juice. Investing in a high-quality nut milk bag is the best option for those who plan to juice regularly, as the fine mesh captures even the smallest particles.
Another factor is the management of oxidation. As soon as fruits and vegetables are cut and blended, they begin to react with oxygen, which can degrade nutrients over time. To minimize this, try to drink your juice immediately after straining. If you must store it, use an airtight glass jar and fill it to the very brim to minimize air headspace, then keep it chilled in the refrigerator for no more than 24 hours.
Be mindful of the “pulp-to-juice” ratio. Some ingredients, like leafy greens, produce very little juice and a lot of pulp. To ensure your drink remains refreshing and liquid-forward, balance these with high-moisture items like celery, pears, or watermelon. Additionally, remember that the leftover pulp is highly nutritious. Instead of throwing it away, consider adding it to compost, stirring it into muffin batter, or mixing it into soups for an extra boost of fiber. Finally, avoid over-blending; the friction from the blades can create heat, which may slightly alter the flavor of delicate greens like parsley or cilantro.
- Flavor Enhancement: Add a small knob of fresh ginger or turmeric to the blender for an anti-inflammatory kick and a spicy undertone.
- The Garnish Factor: Never underestimate a garnish. A simple zest of lemon or a rim of chili salt can turn a basic green juice into a gourmet experience.
- Temperature Control: If you find the blending process warms the juice too much, use frozen glasses or pre-chill your produce in the freezer for 10 minutes before starting.
- Waste Not: Freeze your leftover pulp in ice cube trays. You can drop these into future smoothies or stews for an easy fiber and nutrient boost.
- Hydrating Base: Use coconut water as your liquid base instead of plain water to increase the electrolyte content of your refreshing drink.
Conclusion
Learning how to juice without a juicer is a valuable skill that opens up a world of healthy possibilities without the need for expensive, bulky kitchen gadgets. By utilizing a standard blender and a simple straining method, you can produce high-quality, hydrating beverages that rival any professional juice bar. Whether you are using frozen fruits for a chilled summer treat or fresh vegetables for a nutrient-packed morning boost, the process is efficient and customizable. Remember to serve your creation over ice with a beautiful garnish to maximize the sensory experience of your homemade juice.
❓ Frequently Asked Questions
1
How long does homemade juice last in fridge?
Homemade juice is best consumed immediately for maximum nutrient density but can last up to 48 hours in the fridge. Store it in an airtight glass container to minimize oxidation. Always shake the juice well before drinking, as natural separation will occur since there are no added stabilizers.

2
Can I make juice ahead of time?
Yes, you can make juice ahead of time, though it is most refreshing when fresh. If you must prep in advance, fill your storage container to the very top to reduce the amount of air inside, which helps prevent the juice from browning or losing its vibrant flavor profile.
3
What can I substitute for a nut milk bag?
If you do not have a nut milk bag, you can use a fine-mesh strainer, several layers of cheesecloth, or even a clean, thin cotton kitchen towel. Simply pour the blender contents through the fabric and squeeze firmly to extract the liquid while catching all the solid fiber.
4
How do I know when the juice is done?
The juice is ready once the ingredients are fully pulverized in the blender and you have successfully strained the liquid from the solids. The final product should be a smooth, thin liquid. If it still feels too thick or pulpy, try straining it a second time through cloth.
5
Can I freeze homemade juice?
You can freeze homemade juice for up to three months in airtight, freezer-safe containers. Leave some headspace at the top of the jar for expansion. Alternatively, freeze the juice in ice cube trays to add a hydrating boost to your water or future smoothies without watering them down.