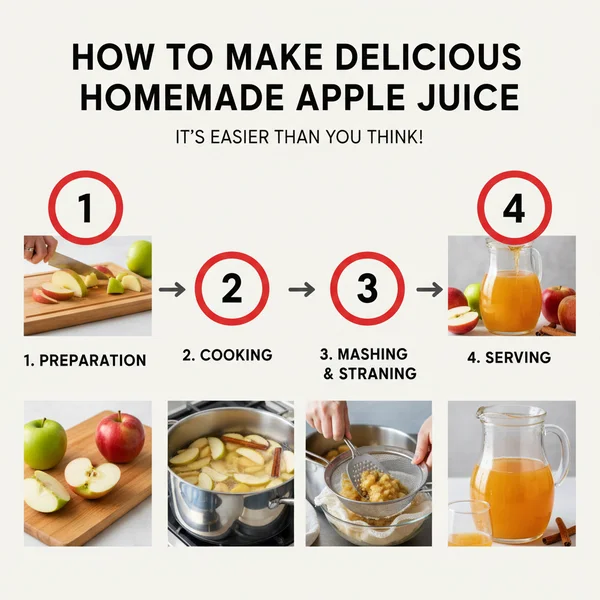
Homemade Apple Juice: Easy & Delicious
There is something truly magical about the aroma of freshly sliced apples filling your kitchen on a bright morning. If you have ever taken a sip of store-bought juice and felt it was a bit too sugary or lacked that crisp, orchard-fresh bite, then learning how to make delicious homemade apple juice its easier than you think. This recipe is designed for those who want a pure, unadulterated beverage that captures the essence of autumn in every glass. Whether you are looking for a hydrating drink after a workout or a refreshing treat for a family brunch, this blender-based method eliminates the need for expensive, bulky juicing machinery. Anyone who appreciates the simple joy of whole foods will fall in love with the vibrant flavor and smooth texture of this liquid gold.
- ⏱️ Prep Time: 15 minutes
- 🍳 Cook Time: 0 minutes
- 👥 Servings: 4 servings
- 📊 Difficulty: Easy
Ingredients for Homemade Apple Juice
- 🍎 6 to 8 medium-sized apples (a mix of Gala, Fuji, and Honeycrisp works best)
- 💧 1.5 cups of cold filtered water (adjust for desired consistency)
- 🍋 1 tablespoon of fresh lemon juice (to preserve color and add brightness)
- 🍯 1 tablespoon of honey or maple syrup (optional, depending on the sweetness of your apples)
- 🧊 Ice cubes for serving
- 🌿 Fresh mint sprigs or cinnamon sticks for garnish
Step-by-Step Instructions
Before you begin, ensure your apples are thoroughly cleaned. Since we are using the whole fruit to maximize the nutritional profile of this refreshing beverage, removing any wax or residue from the skin is vital. Use a fruit wash or a simple mixture of water and vinegar to scrub the skins until they are perfectly clean.
1. Start by prepping your apples. You do not need to peel them, as the skin contains a significant amount of flavor and nutrients. However, you should use a sharp knife to core the apples and remove all seeds. Apple seeds contain small amounts of amygdalin, which is best avoided in large quantities. Cut the remaining apple flesh into roughly one-inch cubes. Keeping the pieces uniform in size will help your blender process the fruit more efficiently without overworking the motor.
2. Once your apples are cubed, transfer them into the canister of a high-speed blender. If you have a smaller blender, you may need to work in two separate batches to avoid overflowing. Add the filtered water to the blender. The water acts as a liquid base that allows the blades to catch the fruit and create a smooth vortex. At this stage, also pour in your tablespoon of fresh lemon juice. The acidity of the lemon acts as a natural antioxidant, preventing the apple enzymes from oxidizing and turning the juice brown.
3. Secure the lid tightly and start the blender on its lowest speed setting. Gradually increase the speed to high. You want to pulverize the apples until the mixture looks like a very thin, frothy applesauce. This usually takes about 45 to 60 seconds of continuous blending. If the mixture seems too thick to move, add an extra quarter cup of water. The goal is a completely liquefied state where no large chunks remain visible against the sides of the blender jar.
4. Now comes the part where we transform the puree into a crystal-clear juice. Place a large fine-mesh strainer over a deep mixing bowl. For the smoothest possible results, line the strainer with a piece of cheesecloth or a dedicated nut milk bag. Pour the apple puree into the lined strainer. Let it sit for a minute to allow the initial liquid to gravity-drain into the bowl.
5. To extract every last drop of the hydrating liquid, gather the corners of the cheesecloth or the top of the nut milk bag. Twist the top to close it and begin squeezing firmly with your hands. You will see the vibrant, chilled juice stream into the bowl, leaving behind a thick, dry pulp. Continue squeezing until you can no longer extract any moisture. This physical extraction ensures you get the most concentrated flavor possible.
6. Taste your freshly pressed juice. Depending on the variety of apples you used, it might be perfectly sweet or perhaps a bit tart. If you prefer a sweeter profile, whisk in your honey or maple syrup now. If the juice feels too concentrated, you can stir in a little more chilled water. This is the beauty of making it at home; you have total control over the flavor balance.
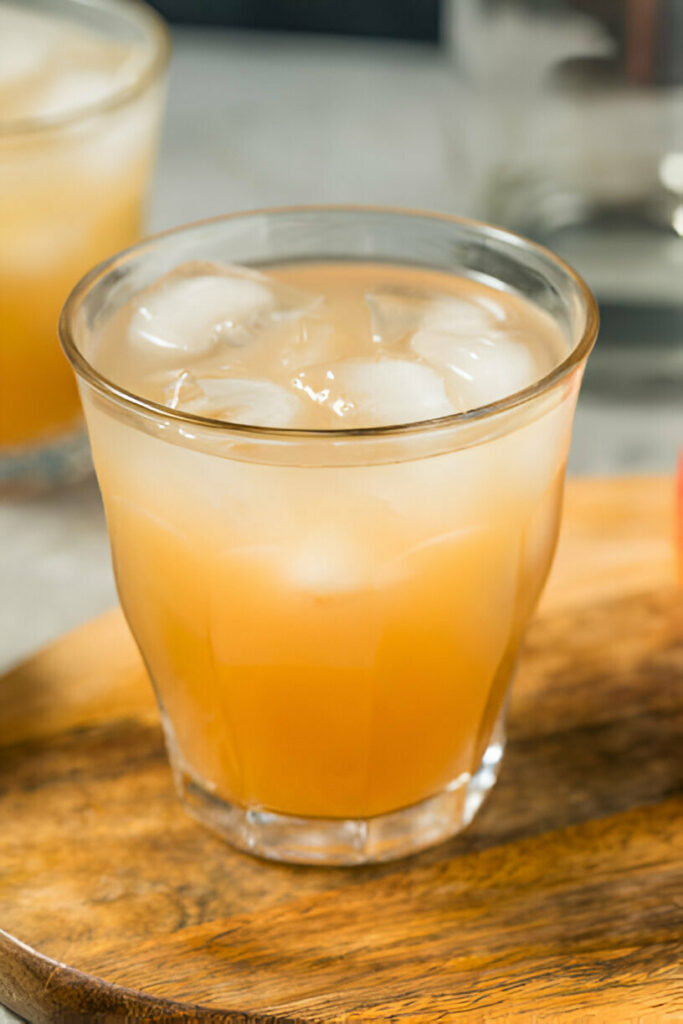
7. For the ultimate tasting experience, transfer the juice into a glass pitcher and place it in the refrigerator for at least thirty minutes. While it can be enjoyed immediately, serving it well-chilled enhances the refreshing qualities of the fruit. When you are ready to serve, fill tall glasses with plenty of ice. Pour the juice over the ice and watch the beautiful golden hue catch the light.
8. The final touch is the garnish. A thin slice of fresh apple or a sprig of mint adds a professional, cafe-style look to your homemade creation. Serve immediately and enjoy the crisp, clean taste of a drink made entirely from scratch.
For the most complex flavor, use a “trio” of apples: one tart (like Granny Smith), one sweet (like Fuji), and one aromatic (like McIntosh). If you want a perfectly clear juice, let the strained liquid sit in the fridge for an hour; the remaining fine solids will settle at the bottom, allowing you to pour off the clear juice from the top. Don’t throw away the leftover pulp! It can be stirred into oatmeal, added to muffin batter, or even used to make homemade fruit leather.
Variations & Substitutions
One of the best aspects of this recipe is its versatility. If you want to create a “frozen” version of this drink, simply place your cored apple chunks in the freezer for two hours before blending. When blended with a little less water, this results in a slushie-like consistency that is incredibly refreshing on a hot afternoon. For a spicy twist, add a half-inch piece of fresh ginger to the blender for a zingy, warming kick that pairs perfectly with the sweetness of the apples.
Dietary modifications are also simple. This recipe is naturally vegan and gluten-free. If you are watching your sugar intake, you can omit the sweeteners entirely or use a few drops of liquid stevia. For a bubbly treat, fill your glass halfway with the concentrated apple juice and top the rest with sparkling mineral water. You can also experiment with garnishes, such as a star anise pod or a sprig of rosemary, to change the aromatic profile of the beverage.
Storage & Make Ahead
Homemade apple juice does not contain the preservatives found in commercial varieties, so it is best enjoyed fresh. However, you can store it in an airtight glass jar or bottle in the refrigerator for up to three days. Over time, some natural separation will occur; simply give the bottle a quick shake to re-incorporate the flavors before pouring. If you have a large harvest of apples and want to make a big batch, this juice freezes beautifully. Pour the juice into silicone freezer molds or ice cube trays. These frozen juice cubes are excellent for dropping into water or even blending into smoothies later on.
Nutrition Information (Per Serving)
Calories: 95 kcal
Carbohydrates: 25g
Fiber: 4g (if some pulp is retained)
Sugars: 19g (natural fruit sugars)
Vitamin C: 12% DV
Note: Nutritional values are estimates based on standard apple sizes and omit optional sweeteners.
The journey of learning how to make delicious homemade apple juice its easier than you think concludes with a glass that is far superior to anything found on a grocery shelf. By using a simple blender and a few minutes of your time, you can provide your family with a hydrating, nutrient-dense drink that celebrates the pure flavor of the fruit. The next time you find yourself with an abundance of apples, skip the stove and the heavy equipment. Reach for your blender, grab some ice, and treat yourself to the most refreshing glass of juice you have ever tasted.
❓ Frequently Asked Questions
1
How long does homemade apple juice last in fridge?
Fresh homemade apple juice typically stays fresh for about 3 to 5 days when stored in an airtight container in the refrigerator. Because it lacks preservatives, it is best consumed quickly. If you notice any off smells or signs of fermentation, it is time to discard the remaining juice.
2
Can I make homemade apple juice ahead of time?
Yes, you can certainly prepare this juice a day in advance. However, keep in mind that natural oxidation might cause the color to darken slightly over time. To minimize this effect, add a splash of lemon juice immediately after pressing and keep it tightly sealed until you are ready.
3
What can I substitute for a nut milk bag?
If you do not have a nut milk bag, you can easily substitute it with a fine-mesh strainer lined with several layers of cheesecloth. Alternatively, a clean, thin kitchen towel or even a coffee filter can work in a pinch, though the straining process might take a little longer.
4
How do I know when apple juice is done?
The juice is ready once you have thoroughly strained the pulp from the liquid after using your blender. The resulting liquid should be smooth, vibrant, and free of any gritty textures. Give it a quick taste test; if it is too concentrated, simply stir in a small amount of water.
5
Can I freeze homemade apple juice?
Absolutely! Apple juice freezes exceptionally well. Pour the juice into freezer-safe containers or silicone molds, leaving a bit of room at the top for expansion. It will maintain its quality for up to six months. Thaw it in the refrigerator overnight before serving for the best flavor and consistency.