Plants for Small Spaces: Best Edible Varieties
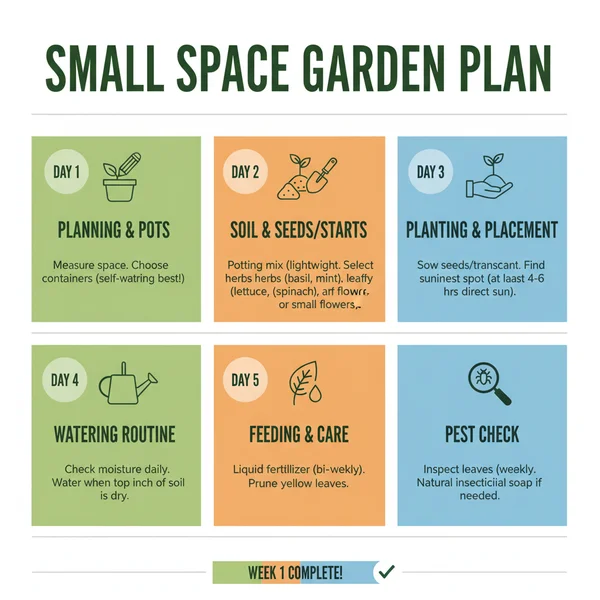
Transforming a cramped apartment into a verdant sanctuary requires more than just buying a few pots; it requires a strategic approach to ensure your greenery thrives without cluttering your living area. This comprehensive 7-day plan provides the ultimate recipe for success when selecting and arranging plants for small spaces. Throughout this week-long schedule, we will guide you through the prep time needed to assess your environment, the instructions for selecting the right species, and the final cooking time—the actual arrangement of your indoor garden. By following this structured timeline, you can maximize your square footage and improve your air quality. Whether you have a tiny balcony or a windowless corner, this schedule ensures your plant collection is both beautiful and manageable.
Duration: 7 Days
Goals: Optimize vertical space, select low-maintenance species, and establish a sustainable care routine.
Expected Outcomes: A fully styled, space-efficient indoor garden that enhances well-being without overwhelming the home.
Before You Start
Before diving into your new botanical journey, it is essential to treat this process like a gourmet meal. You need the right ingredients and a clear understanding of the servings—or in this case, the number of plants—your space can realistically support. Start by gathering your tools: a moisture meter, high-quality potting mix, and a variety of containers with drainage holes. Consider the “calories” of your home—the light levels. Plants consume light as energy, and overestimating or underestimating the calories (lumens) available in your corners will lead to poor results. Ensure you have clear walkways and that no plant placement will interfere with your daily movement. Preparation is the key to minimizing the prep time during the actual implementation phases later in the week.
Day-By-Day Schedule
Day 1: The Environmental Audit
The first day is all about assessment. Much like checking the temperature of an oven before starting a recipe, you must understand your microclimates. Track the sun’s movement from sunrise to sunset. Identify “hot spots” near windows and “low-calorie” zones in hallways or bathrooms. Measure your available surfaces, including windowsills, floating shelves, and top-of-fridge space. This data serves as the foundation for your shopping list, ensuring you don’t buy a sun-loving succulent for a dark corner.

- Map out light intensity in every room (Direct, Indirect, Low).
- Identify drafty areas near AC units or heaters that might stress sensitive foliage.
Day 2: Curating the Species List
Today, you select your ingredients. Focus on plants for small spaces that grow vertically rather than horizontally. Research species like the Snake Plant (Sansevieria), which has a small footprint, or trailing Pothos that can be hung to save floor space. Your goal is to create a list that offers diverse textures and heights. Think about the servings of green you want in each room—perhaps two small plants for the desk and one larger, narrow floor plant for the corner.
- Select “upward growers” like ZZ plants or Sansevieria.
- Choose trailing “cascaders” like String of Pearls or Heartleaf Philodendron for high shelves.
Day 3: Procurement and Potting Prep
With your list in hand, visit your local nursery. When selecting plants, inspect them for pests—this is vital prep time to avoid future headaches. Purchase pots that complement your decor but prioritize drainage. If you find a beautiful decorative pot without a hole, use it as a “cachepot” by keeping the plant in its plastic nursery liner. Gather your soil, pebbles for drainage, and organic fertilizer. This is the hardware phase of your urban garden recipe.
- Purchase healthy specimens with no yellowing leaves or visible bugs.
- Buy lightweight pots (fiberglass or plastic) if you plan on using wall-mounted shelves.
Day 4: Vertical Implementation
In small spaces, the floor is precious real estate. Today, focus on the walls and ceilings. Follow instructions for installing sturdy wall hooks or floating shelves. By moving your plants for small spaces upward, you draw the eye toward the ceiling, making the room feel larger. Hanging planters are perfect for “curtain” plants like English Ivy, which can provide a living screen over a window without blocking all the light.
- Install wall-mounted planters or a vertical trellis system.
- Hang trailing plants at varying heights to create visual depth and “green layers.”
Day 5: Surface Styling and Grouping
Now it is time to style your desks, tables, and windowsills. Grouping plants in odd numbers (sets of 3 or 5) creates a more natural look. This “grouping” recipe also helps plants create their own humid microclimate, which is beneficial in dry apartments. Ensure that smaller “servings” of plants don’t clutter your workspace; use tiered stands to maximize the verticality of a small table or desk area.
- Arrange plants by height: tallest in the back, shortest in the front.
- Use attractive trays to catch water and keep your furniture safe.
Day 6: The Nutritious Feeding Routine
Every living thing needs fuel, but over-feeding is a common mistake. Today, follow the instructions for a light first watering and fertilization if it’s the growing season. Think of this as the “simmering” stage of your cooking time. Use filtered water at room temperature to avoid shocking the roots. Check the soil moisture for each plant; just because they are in the same room doesn’t mean they share the same thirst levels.
- Apply a diluted liquid fertilizer to provide essential “calories” for growth.
- Dust the leaves with a damp cloth to ensure they can photosynthesize efficiently.
Day 7: Evaluation and Care Schedule
On the final day, observe how the plants are settling into their new homes. Are they getting enough light? Is the flow of the room still functional? Create a permanent care calendar. This helps manage the long-term cooking time for your garden. Note down which plants need weekly water and which can go two weeks without a drink. Successful small-space gardening is about consistency and observation rather than constant interference.
- Set reminders on your phone for watering and rotating pots.
- Take photos to track growth progress over the coming months.
Modifications & Alternatives
Not every home follows the same recipe. If you live in a basement apartment with virtually no natural light, you will need to modify this plan by incorporating LED grow lights. These can be integrated into your shelving units to provide the necessary “calories” your plants need to survive. Alternatively, if you have pets, you must swap out toxic ingredients like Lilies or Aloe Vera for pet-safe options like Spider Plants or Boston Ferns. For those with zero floor space, consider a “window garden” using suction-cup shelves that attach directly to the glass. This alternative maximizes servings of greenery without using any shelf or floor real estate at all. Always adjust the prep time and care frequency based on the humidity levels of your specific geographic location.
- Less is More: It is better to have three thriving plants than ten struggling ones that clutter your space.
- Rotation is Key: Rotate your pots 90 degrees every week to ensure even growth and prevent the plant from leaning.
- Drainage is Non-Negotiable: Never let your plants sit in standing water, as this leads to root rot—the fastest way to ruin your garden recipe.
- Vertical Thinking: Always look up; the space above your cabinets is often the best place for trailing varieties.
Conclusion
Following this 7-day schedule provides a clear recipe for integrating plants for small spaces into your lifestyle. By dedicating specific prep time to assessment and curation, you ensure that your indoor jungle remains a source of joy rather than a source of stress. Once you have mastered the initial instructions for setup, the ongoing “cooking time“—the maintenance—becomes a relaxing ritual. You will soon notice improved air quality and a more serene atmosphere in your home. Your next steps are simply to watch your garden grow and perhaps propagate your thriving plants to share with others!
❓ Frequently Asked Questions
1
How long does harvested produce last in fridge?
Harvested produce like herbs typically lasts about one week in the refrigerator. To maximize freshness, place the stems in a jar of water or wrap them in a damp paper towel before storing in a sealed bag. This ensures your home-grown ingredients stay crisp and flavorful for your next recipe.
2
Can I prep herb pots ahead of time?
Yes, you can prepare your small space garden pots several days before you actually plant your seeds. Simply fill your containers with organic potting soil and ensure they have proper drainage. When you are ready, just moisten the soil and follow the planting instructions for your specific edible plants.
3
What can I substitute for potting soil?
If you do not have potting soil, you can use a mix of coconut coir, perlite, and vermiculite. This soil-less medium is excellent for container gardening because it is lightweight and retains moisture well. Just remember to add a liquid fertilizer since these components do not contain natural nutrients.
4
How do I know when herbs are ready to harvest?
You will know your plants are ready for harvest when they have established at least three sets of true leaves. For most herbs, once the plant is about six inches tall, you can begin snipping the outer leaves. Regular harvesting encourages the plant to grow fuller and more productive.
5
Can I freeze harvested herbs?
You can certainly freeze many types of herbs and leafy greens grown in small spaces. The best method is to chop them finely and freeze them in ice cube trays with a little water or oil. This allows you to drop a flavor-packed cube directly into any hot recipe.