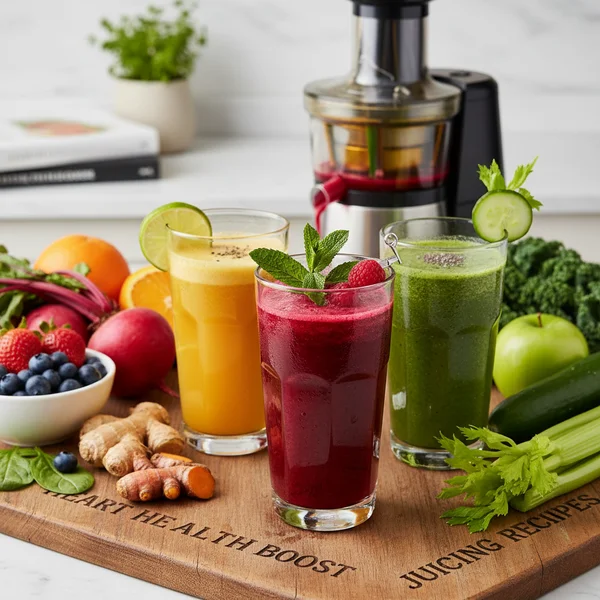
Juicing Recipes for Heart Health: Simple & Healthy
Imagine a glass filled with a deep, radiant crimson liquid that sparkles under the morning light, promising a refreshing start to your day. As you take your first sip, you are greeted by a crisp, sweet explosion of flavor that perfectly balances the earthy richness of garden-fresh beets with the bright, citrusy zing of lemon and the subtle, spicy warmth of fresh ginger. This isn’t just a drink; it is a revitalizing tonic that feels like a concentrated burst of vitality flowing through your system. This recipe is designed specifically for those who want to prioritize their cardiovascular wellness without sacrificing an ounce of culinary pleasure. Whether you are a long-time health enthusiast or someone just beginning to explore the world of liquid nutrition, you will fall in love with the smooth texture and invigorating profile of this heart-healthy blend.
- ⏱️ Prep Time: 10 minutes
- 🍳 Cook Time: 0 minutes
- 👥 Servings: 1 serving
- 📊 Difficulty: Easy
Ingredients for the Ultimate Heart-Health Blend
To create this delicious and nutrient-dense juice, you will need the following fresh ingredients. For the best results and the most vibrant flavor, try to source organic produce whenever possible.
- 2 medium-sized red beets (including the greens if they are fresh)
- 3 large organic carrots, scrubbed and ends trimmed
- 1 large Granny Smith apple (or any tart green apple)
- 1-inch piece of fresh ginger root, peeled
- 1/2 large lemon, peel removed
- 1 cup of fresh dinosaur kale or baby spinach leaves
- 1/2 cup of fresh cucumber (optional, for extra hydration)
- A pinch of turmeric powder (optional)
Step-by-Step Instructions
The process of making juicing recipes for heart health is surprisingly therapeutic and straightforward. Follow these detailed instructions to ensure you get the most juice and nutrition out of your produce.
1. The first step in any quality juice recipe is the preparation of your produce. Begin by thoroughly washing the beets, carrots, apple, and greens under cool running water. Use a vegetable brush to scrub the beets and carrots to remove any stubborn soil, especially if you plan to leave the skins on for extra nutrients. Pat the ingredients dry with a clean kitchen towel.
2. Once your vegetables and fruits are clean, you need to prep them for the juicer. Cut the beets into quarters or eighths, depending on the size of your juicer’s feed chute. If the beet greens are still attached and look vibrant, chop them into smaller pieces to be juiced alongside the roots. Slice the carrots into manageable lengths and core the apple, removing the seeds but keeping the skin intact, as the skin contains high levels of polyphenols.
3. Prepare your citrus and aromatics. Peel the lemon, making sure to remove the bitter yellow zest while leaving as much of the white pith as possible, as the pith is rich in bioflavonoids. For the ginger, you can use the edge of a spoon to gently scrape away the thin skin, though many high-powered juicers can handle the skin without an issue.
4. Now, it is time to start the juicing process. Turn on your juicer and begin with the leafy greens. If you are using a centrifugal juicer, it helps to “sandwich” the kale or spinach between harder pieces like the apple or beets. This ensures that the lighter leaves are pressed effectively rather than just flying through the machine.
5. Follow the greens with the ginger and the lemon. By juicing these early on, the subsequent watery ingredients will help wash the potent ginger and lemon oils through the machine and into your glass, ensuring you don’t lose any of that concentrated flavor.
6. Gradually feed the beet pieces and carrots into the machine. If you are using a masticating juicer, go slowly to allow the auger to fully crush the fiber. You will notice the juice changing from a dark green to a brilliant, deep purple-red. This color is a sign of the powerful betalains found in beets, which are excellent for supporting healthy blood flow.
7. Finish the process by juicing the apple and cucumber. These ingredients have high water content and act as a natural “rinse” for your juicer, pushing through any remaining pulp or juice from the previous steps. Once the last piece has been processed, let the machine run for an additional 30 seconds to catch the final drops.
8. Stir the juice gently with a wooden or plastic spoon to incorporate all the layers of flavor. Some juices may naturally separate or develop a small layer of foam on top. If you prefer a very clear juice, you can pour the liquid through a fine-mesh strainer or a piece of cheesecloth into your serving glass.
9. Serve the juice immediately to maximize the enzymatic activity and nutrient density. If you prefer a colder drink, you can juice refrigerated produce or serve the finished product over a few ice cubes. Sip slowly and enjoy the natural sweetness and invigorating zing of your homemade creation.
10. Clean your juicer immediately after use. This is perhaps the most important part of the instructions; vegetable fibers and natural sugars can dry quickly, making the mesh screen difficult to clean later. A quick rinse with warm soapy water and a light scrub with a dedicated brush will keep your equipment in top shape for years to come.
To get the highest yield from your leafy greens, roll them tightly into a ball or a cigar shape before feeding them into the juicer. If you find the earthy taste of beets too strong, try adding an extra half of an apple or a few stalks of celery to mellow out the flavor profile. Always use the freshest produce possible; if a carrot feels limp or a beet feels soft, the juice will lack that bright, crisp finish that makes this recipe so special.

Variations & Substitutions
One of the best things about juicing is the ability to customize the ingredients based on your personal palate or what is currently in season. If you find that you are out of kale, you can easily substitute it with Swiss chard or even a handful of parsley, which is fantastic for kidney support. For those who prefer a less sweet juice, replace the apple with two stalks of celery; this will lower the natural sugar content while adding a boost of electrolytes and organic sodium.
If you are following a specific dietary protocol, such as a low-sugar or keto-friendly diet, you can swap the carrots for extra cucumber and use a lime instead of a lemon for a slightly different citrus profile. To make the drink more “anti-inflammatory,” consider adding a small piece of fresh turmeric root alongside the ginger. For a creamier texture and a boost of healthy fats, you can even whisk in a teaspoon of high-quality flaxseed oil or hemp oil into the finished juice before serving.
Storage & Make Ahead
For the best flavor and the highest nutritional value, it is always recommended to consume your juice within 15 to 20 minutes of extraction. However, life can be busy, and you may need to prepare your juice in advance. If you must store it, pour the juice into a glass airtight container, such as a mason jar, filling it all the way to the very top to minimize the amount of oxygen trapped inside. This helps prevent oxidation, which can degrade the nutrients and change the color of the juice.
Store the sealed jar in the coldest part of your refrigerator for up to 24 hours. If you find yourself with extra juice that you cannot finish, you can freeze it in silicone ice cube trays. These “juice cubes” are perfect for dropping into smoothies or even into a glass of sparkling water for a quick, flavored refresher. Do not store fresh juice at room temperature, as it can spoil quickly.
Nutrition Information
This heart-healthy juice is a powerhouse of vitamins, minerals, and antioxidants. While the exact values can vary based on the size of your produce, a typical serving of this recipe contains approximately:
- Calories: 145 kcal
- Total Carbohydrates: 34g
- Dietary Fiber: 0.5g (most fiber is removed during juicing)
- Sugars: 22g (natural fruit and vegetable sugars)
- Protein: 3g
- Vitamin A: 250% DV
- Vitamin C: 70% DV
- Potassium: 15% DV
- Iron: 10% DV
Beyond the basic numbers, this juice is rich in nitrates from the beets, which the body converts into nitric oxide. Nitric oxide helps to relax and dilate blood vessels, supporting healthy blood pressure levels. The carrots and apples provide a significant dose of antioxidants that help protect the cardiovascular system from oxidative stress. Incorporating this recipe into your weekly routine is a delicious way to drink your way to a happier, healthier heart. Enjoy the process of creating your own fresh blends and feel the difference that real, whole-food nutrition can make in your daily energy levels and long-term wellness.
❓ Frequently Asked Questions
1
How long does heart healthy juice last in fridge?
Fresh juice is best consumed immediately, but you can store it in an airtight glass container for up to 24 hours. To maintain nutrient integrity, fill the container to the top to minimize oxidation. After a day, the enzymes and vitamins begin to degrade quite significantly.

2
Can I make juicing recipes ahead of time?
While drinking juice fresh is ideal, you can prep your ingredients in advance. Chop and portion your vegetables and fruits into containers the night before. This reduces your morning prep time, making it easier to follow your heart healthy recipe routine consistently every single day of the week.
3
What can I substitute for beets in this recipe?
If you dislike beets, substitute them with red cabbage or pomegranate. Both provide excellent cardiovascular benefits and antioxidants similar to those found in beets. Carrots are another great option, adding natural sweetness and vitamin A while maintaining a vibrant color and smooth texture for your healthy juice blend.
4
How do I know when the juice is done?
Your juice is done once all produce has passed through the juicer and the pulp is relatively dry. Ensure the machine has processed every bit of the ingredients to extract the maximum amount of nutrients. If using a high-speed blender, blend until the consistency is perfectly smooth and liquid.
5
Can I freeze fresh heart healthy juice?
Yes, you can freeze fresh juice in silicone trays or freezer-safe jars for up to three months. Leave some headspace for expansion. Thaw in the refrigerator before drinking. While some nutrients are lost during freezing, it is a convenient way to reduce food waste and save prep time.