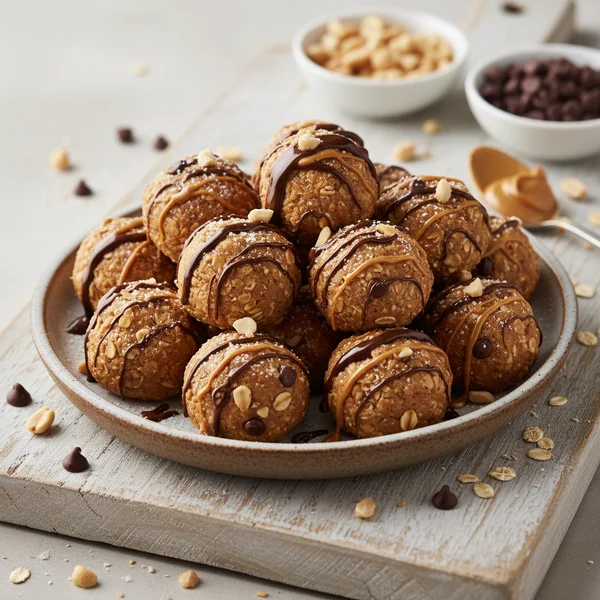
No-Bake Peanut Butter Bites Recipe: Easy & Quick
Imagine a snack that perfectly balances the creamy richness of protein-packed nut butter with the wholesome chew of hearty oats and a hint of natural sweetness. These no bake peanut butter bites are the ultimate solution for anyone seeking a quick energy boost, a kid-friendly lunchbox addition, or a guilt-free late-night treat. Whether you are prepping for a busy week of family dinners and need a grab-and-go snack, or you are looking for a comforting morsel to enjoy with your morning coffee, this recipe delivers maximum flavor with minimal effort. You will love how these bites satisfy your sweet tooth while providing lasting energy, making them a favorite for fitness enthusiasts and busy parents alike.
- ⏱️ Prep Time: 15 minutes
- 🍳 Cook Time: 0 minutes
- 👥 Servings: 12 servings
- 📊 Difficulty: Easy
Ingredients
To create these delicious no bake peanut butter bites, you will need to gather a few pantry staples. This recipe focuses on whole ingredients that provide a balance of healthy fats, fiber, and protein. Here is everything you will need:
- Old-Fashioned Rolled Oats: 1 ½ cups (provide the essential chewy texture and fiber)
- Creamy Peanut Butter: 1 cup (use a high-quality, slightly drippy variety for the best binding)
- Honey or Pure Maple Syrup: ½ cup (acts as the natural sweetener and liquid glue)
- Ground Flaxseeds or Chia Seeds: ¼ cup (adds a nutritional punch of Omega-3s and helps thicken the mixture)
- Mini Chocolate Chips: ½ cup (semi-sweet or dark chocolate works beautifully here)
- Pure Vanilla Extract: 1 teaspoon (elevates the overall flavor profile)
- Sea Salt: ¼ teaspoon (essential for balancing the sweetness and enhancing the peanut butter)
- Optional Mix-ins: 2 tablespoons of shredded coconut or hemp hearts for extra texture
Step-by-Step Instructions
Follow these detailed instructions to ensure your no bake peanut butter bites turn out perfectly every single time. Because there is no cooking time involved, the key to success lies in the mixing and the consistency of your “dough.”
Step 1: Prepare Your Workspace and Mixing Bowl
Start by clearing a clean workspace on your kitchen counter. You will need a large mixing bowl and a sturdy spatula or wooden spoon. Unlike baking cakes where you need light movements, this recipe requires some muscle to ensure all the ingredients are thoroughly incorporated. Take a moment to ensure your peanut butter is at room temperature; if it has been in the fridge and is too stiff, it will be difficult to mix. You can microwave it for 15 seconds to soften it if necessary.
Step 2: Combine the Wet Ingredients and Aromatics
In your large bowl, add the creamy peanut butter, your choice of honey or maple syrup, and the vanilla extract. Use your spatula to stir these together until they form a smooth, glossy, and uniform liquid. This step is crucial because it ensures the sweetener and vanilla are evenly distributed throughout the batch. If you are using sea salt, whisk it into this wet mixture now so you don’t end up with salty clumps later. The aroma of the vanilla hitting the peanut butter is one of the best parts of the prep time.
Step 3: Integrate the Dry Nutritional Bases
Slowly add the ground flaxseeds or chia seeds into the wet mixture. Stir well until they are fully submerged. These seeds act as a natural thickening agent; as they sit in the liquid, they begin to absorb some of the moisture, which helps the bites hold their shape later. Once the seeds are in, pour in the old-fashioned rolled oats. Use a folding motion to ensure every single oat flake is coated in the peanut butter mixture. You want to avoid any “dry spots” in your bowl.
Step 4: The Chocolate Chip Fold
Now that your base is thick and heavy, it is time to add the mini chocolate chips. It is important to use “mini” chips because they distribute more evenly throughout the small bites, ensuring you get a bit of chocolate in every single mouthful. If the mixture feels warm from the friction of stirring, let it sit for two minutes before adding the chocolate so the chips don’t melt. Gently fold them in until they are scattered throughout the dough.
Step 5: The Essential Chill Phase
While you could technically roll the bites now, the dough is likely quite sticky and soft. For the best results, place the entire bowl in the refrigerator for about 20 to 30 minutes. This chilling period allows the oats to soften slightly and the peanut butter to firm up. This small investment in time makes the rolling process significantly easier and less messy for your hands.
Step 6: Portioning and Shaping
After the mixture has chilled, remove the bowl from the fridge. Use a small cookie scoop or a rounded tablespoon to portion out the dough. Scoop a portion and roll it firmly between your palms to form a ball about one inch in diameter. You should be able to produce exactly 12 servings if you make them the size of a golf ball, or more if you prefer bite-sized nuggets. If the mixture starts sticking to your hands, lightly dampen your palms with a tiny bit of water or coconut oil.
Step 7: The Final Set
Place the finished bites on a parchment-lined baking sheet or a large plate. While they are ready to eat immediately, placing them back in the fridge for another 15 minutes helps them set into a firm, professional-looking snack. This ensures they won’t fall apart when you pack them into a container for the day ahead.
If your mixture seems too dry or crumbly to roll, add an extra tablespoon of peanut butter or honey. Conversely, if it is too sticky, add another tablespoon of oats. Always use “Old Fashioned” oats rather than “Quick Oats” if you prefer a heartier, more textured bite. For a professional touch, roll the finished bites in cocoa powder or crushed peanuts for an outer coating that prevents them from sticking together in storage.
Variations & Substitutions
This recipe is incredibly versatile and can be adapted to suit almost any dietary preference or pantry inventory. For a vegan version, simply ensure you are using maple syrup instead of honey and verify that your chocolate chips are dairy-free. If you need a gluten-free option, be sure to purchase certified gluten-free rolled oats, as standard oats are often processed in facilities that handle wheat.
For flavor variations, try replacing the chocolate chips with dried cranberries or raisins for a “peanut butter and jelly” vibe. If you have a nut allergy in the house, sunflower seed butter (SunButter) makes an excellent 1:1 substitute for peanut butter. You can also boost the protein content by replacing 1/4 cup of the oats with your favorite vanilla or chocolate protein powder.
Storage & Make Ahead
One of the best things about no bake peanut butter bites is how well they store. To keep them fresh, place the bites in an airtight container. They will stay perfectly chewy and delicious in the refrigerator for up to two weeks. If you like to meal prep in large batches, these bites are excellent for freezing. Simply place them on a tray to freeze individually first, then transfer them to a freezer-safe bag. They will last for up to three months in the freezer. You can eat them straight from the freezer for a firm, fudge-like treat, or let them thaw for ten minutes at room temperature.
Each serving of these no bake peanut butter bites provides a satisfying balance of nutrients to keep you fueled throughout the day. Values are approximate based on standard ingredients.
- Calories: 195 kcal
- Total Fat: 11g
- Protein: 6g
- Carbohydrates: 22g
- Fiber: 3g
- Sugars: 12g
❓ Frequently Asked Questions
1
How long does no-bake peanut butter bites last in fridge?
These peanut butter bites will stay fresh and delicious for up to one week when stored in an airtight container in the refrigerator. Keeping them chilled ensures they maintain their shape and chewy texture, making them a convenient grab-and-go snack for busy mornings or post-workout fuel.
2
Can I make these bites ahead of time?
Absolutely! These are the perfect meal-prep snack. You can make a large batch on Sunday and enjoy them throughout the week. In fact, they often taste even better after chilling for a few hours, as the flavors meld together and the oats fully hydrate for a better bite.
3
What can I substitute for peanut butter?
If you have an allergy or simply prefer a different flavor, you can easily swap peanut butter for almond butter, cashew butter, or sunflower seed butter. Just ensure the alternative butter has a similar creamy consistency so the bites hold together properly without needing extra liquid or oats.
4
How do I know when the bites are done?
Since there is no cooking time involved, these bites are done as soon as the mixture is well-combined and easy to roll into balls. If the dough feels too sticky, chill it in the fridge for ten minutes before rolling; if it is too dry, add more peanut butter.
5
Can I freeze these bites?
Yes, these freeze beautifully for up to three months. Place the rolled bites on a baking sheet to freeze individually before transferring them to a freezer-safe bag. This prevents them from sticking together, allowing you to pull out one or two whenever you need a quick, healthy treat.