How to Clean a Juicer: Quick & Easy Guide
To clean a juicer effectively, you must disassemble the machine immediately after use and rinse all parts under warm water. The most critical step is scrubbing the fine mesh filter with a soft-bristled brush to remove stubborn pulp fibers. Soak removable components in warm, soapy water for 10–15 minutes, rinse thoroughly, and allow them to air dry completely before reassembling. Regular maintenance prevents bacterial growth and ensures your juice remains refreshing and nutrient-dense.
Understanding the Importance of Juicer Hygiene and Maintenance
Maintaining a clean juicer is not just about aesthetics; it is a fundamental requirement for food safety and machine longevity. When you process fruits and vegetables to create a hydrating beverage, the machine extracts liquid while separating the fibrous pulp. This pulp, rich in natural sugars and moisture, becomes a breeding ground for bacteria and mold if left sitting in the nooks and crannies of the device. Furthermore, the micro-mesh screens found in most centrifugal and masticating juicers are prone to mineral buildup and “film” formation, which can eventually clog the pores and reduce the efficiency of the extraction process.
Scientific studies on kitchen hygiene often highlight juicers as high-risk appliances because they contain many moving parts and hidden chambers. If old organic matter remains trapped in the auger or the blade assembly, it can ferment, affecting the flavor of your next batch of chilled juice. Instead of a crisp, refreshing drink, you might end up with a beverage that tastes slightly off or contains harmful pathogens.
Moreover, proper cleaning preserves the integrity of the motor. When the mesh screen is clogged with dried-on residue, the motor must work harder to push liquid through, leading to overheating and a shorter lifespan for the appliance. Unlike a simple blender, which typically features a single jar and blade assembly that can be cleaned with a quick pulse of soapy water, a juicer requires a more methodical teardown to ensure every surface that touches the produce is sanitized. By incorporating a strict cleaning regimen, you ensure that every glass of juice is as healthy as it is delicious, providing the pure, hydrating benefits you expect from fresh produce.
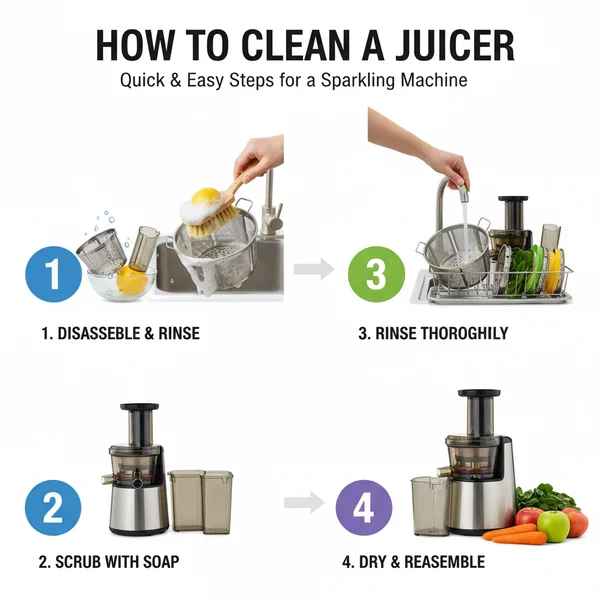
How to Clean a Juicer: A Step-by-Step Guide
To keep your appliance in peak condition, follow these comprehensive steps every time you finish preparing your favorite chilled beverage.
1. Unplug and Disassemble: Safety is paramount. Always unplug the juicer from the power source before you begin. Carefully disassemble the unit, removing the pusher, the hopper, the lid, the blade or auger, the mesh filter, and the pulp container. If your machine has a specialized juice spout or “drip-stop” feature, ensure those are opened or removed as well.
2. Clear the Pulp: Use a spatula or your hands to scrape out the bulk of the pulp from the collection bin and the internal housing. Many people choose to line their pulp bin with a compostable bag before juicing to make this step even faster. While the pulp is great for composting, it can become like “cement” if it dries inside the machine.
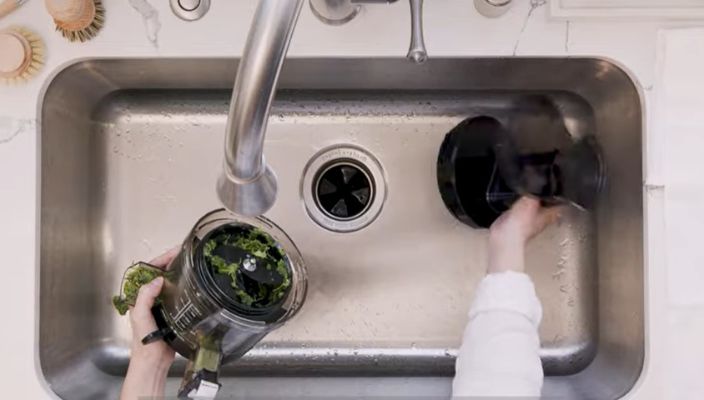
3. The Immediate Rinse: Before you even sit down to enjoy your refreshing drink, take the disassembled parts to the sink. Rinse them under warm running water to remove the loose particles. This prevents the natural sugars from sticking to the plastic and metal surfaces.
4. The Soaking Phase: Fill your sink or a large basin with warm water and a few drops of mild dish soap. Submerge all the non-electrical components. Let them soak for about 10 minutes. This is particularly helpful if you have been juicing starchy vegetables like carrots or fibrous greens like kale.
5. Scrubbing the Mesh Filter: This is the most important step. Use a specialized cleaning brush (often provided with the juicer) or a clean nylon toothbrush to scrub the fine mesh screen. Scrub from both the inside and the outside. If you hold the screen up to the light and see any blocked holes, continue scrubbing until they are clear. If you find frozen or particularly stubborn residues, a mixture of water and lemon juice can help break them down.
6. Clean the Base: Use a damp microfiber cloth to wipe down the motor base. Never submerge the base in water. Pay attention to the area where the motor shaft meets the juice bowl, as juice can often leak down into this crevice.
7. Rinse and Air Dry: Rinse all parts thoroughly with clean water to remove any soap residue. Lay them out on a clean towel or a drying rack. It is vital to let the parts air dry completely before reassembling the unit to prevent the “musty” smell that occurs when moisture is trapped in a sealed machine.
Important Considerations for Long-Term Juicer Care
When cleaning your equipment, there are several nuances to keep in mind to avoid damaging the components. One common mistake is putting all juicer parts in the dishwasher. While many modern manufacturers claim their parts are “dishwasher safe,” the high heat and harsh detergents used in dishwashers can cause plastic components to become brittle, cloudy, or warped over time. If you want your juicer to last for years, hand-washing is always the superior choice.
Another consideration is the staining caused by high-pigment produce. Carrots, beets, and turmeric are notorious for leaving orange or red stains on plastic housings. To combat this, you can wipe the stained areas with a cloth dipped in a small amount of vegetable oil before washing with soap. The oil helps lift the carotene pigments. Alternatively, a paste made of baking soda and water can act as a gentle abrasive to lift stains without scratching the plastic.
Hard water mineral buildup is another silent enemy of juicer efficiency. If you live in an area with hard water, you may notice a white, cloudy film developing on the clear plastic parts. This isn’t just an aesthetic issue; it can harbor bacteria. Periodically soaking your removable parts in a solution of one part white vinegar to three parts water will dissolve these minerals and keep the components looking crystal clear.
Lastly, consider the “flavor cross-contamination” factor. If you frequently switch between sweet fruit juices and savory vegetable blends, a thorough cleaning is the only way to ensure your morning orange juice doesn’t taste like last night’s garlic-infused green tonic.
- The Blender Trick: If you are in a rush, some people use a blender to pre-rinse certain parts by pulsing them with soapy water, though this doesn’t replace the need for scrubbing the mesh filter.
- Serve it Chilled: Always serve your fresh juice over ice or in a chilled glass for the most refreshing experience. A sprig of mint or a citrus wedge as a garnish can elevate the presentation.
- Don’t Forget the Spout: Use a small pipe cleaner or straw brush to clean the juice exit spout, as this is a common place for dried juice to hide.
- Frozen Fruit Caution: If your juicer has a “frozen treat” attachment, clean it immediately after use, as the sugars in frozen fruit can be even stickier than fresh juice.
- Natural Deodorizer: If your juicer develops an odor, soak the parts in a mixture of water and baking soda to neutralize the smell.
Final Thoughts on Juicer Maintenance
Cleaning a juicer may seem like a daunting task compared to the simplicity of rinsing a blender, but the rewards are well worth the effort. A clean machine produces a high-quality, hydrating juice that is free from off-flavors and harmful bacteria. By following a consistent routine of disassembling, soaking, and meticulous scrubbing—especially of the mesh screen—you protect your investment and ensure that every drink you pour is perfectly chilled, refreshing, and nutrient-complete. Whether you are prepping a simple celery juice or a complex citrus blend with a beautiful garnish, the secret to the best juice is always a pristine machine. Summarily, treat your juicer with care, and it will continue to provide you with healthy, vibrant beverages for years to come.
❓ Frequently Asked Questions
1
How long does a cleaned juicer last?
A properly cleaned and dried juicer can last for many years, provided you maintain the motor and blades. Regular cleaning after every use prevents the buildup of bacteria and mold, ensuring your machine remains in peak condition for preparing healthy, refreshing, and hydrating drinks daily without any contamination.

2
Can I clean it ahead of time?
You should clean your juicer immediately after use rather than trying to clean it later. Allowing pulp and residue to sit makes it significantly harder to remove once it dries. If you are in a rush, at least rinse the parts under warm water to prevent debris hardening.
3
What can I substitute for specialized cleaners?
You can easily substitute expensive specialized cleaners with common household items like white vinegar or baking soda. A mixture of water and vinegar works wonders for removing mineral deposits, while a baking soda paste can help lift stubborn stains from plastic components without using harsh chemicals or abrasive tools.
4
How do I know when my juicer is done?
Your juicer is clean when all visible pulp, residue, and films are removed from every component. Pay close attention to the fine mesh screen; it should be completely clear so you can see through the tiny holes. There should be no lingering odors or sticky surfaces on any part.
5
Can I freeze juicer parts for easier cleaning?
You should never freeze juicer parts, as extreme temperatures can cause plastic components to become brittle and crack. Additionally, freezing can damage the seals and motor if any moisture is trapped inside. Always store your juicer in a dry, room-temperature cabinet to ensure its longevity and continued high performance.